Download PDF
Security
STOCKHOLM is a platform of the Emergency Supply Prepositioning Strategy (ESUPS).
ESUPS is hosted by Welthungerhilfe (WHH) and led by a Steering Group of key humanitarian actors.
STOCKHOLM has been developed by Tonkin + Taylor, a registered company specialising in agile post-disaster website development. It is managed by WHH and hosted on two servers located in Europe.
STOCKHOLM adheres to the requirements of the General Data Protection Regulation (GDPR).
Microsoft azure ad authentifiation
STOCKHOLM uses Microsoft Azure AD login as one of the authentication methods. It is a cloud-based identity and access management service managed by Microsoft.
This app requires your internal IT administrator’s approval to use it as a sign-in method, and to read the user profile (e.g. email and username).
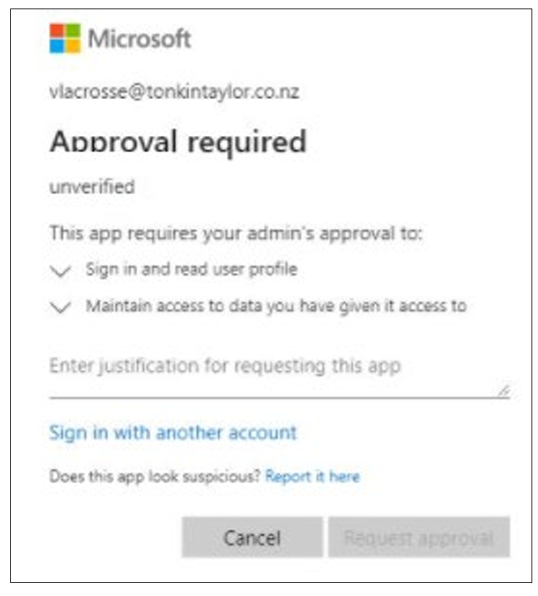
Here is a screenshot of the Microsoft required approval pop-up that appears:
Once tenant-wide approval has been granted by your internal IT administrator, anyone from that same agency will be able to access STOCKHOLM.
Individual approval for different users within the same agency is not required.
The App requires the IT administrator’s approval to:
1. Sign in and read your user profile
2. Maintain access to data you have given it permission to access.
The table below explains further.

How to provide approval
1. Sign in to the Azure portal using an Azure AD user account with one of the following roles:
a) Global Administrator or Privileged Role Administrator, for granting consent for apps requesting any permission, for any API.
b) Cloud Application Administrator or Application Administrator, for granting consent for apps requesting any permission for any API, except Azure AD Graph or Microsoft Graph app roles (application permissions).
c) A custom directory role that includes the permission to grant permissions to applications, for the permissions required by the application.
2. Select Azure Active Directory, and then select Enterprise applications.
3. Select the application to which you want to grant tenant-wide admin consent, and then select Permissions.
4. Carefully review the permissions that the application requires.
5. If you agree with the permissions the application requires, select Grant admin consent.