Download PDF
Instructions
Within STOCKHOLM, each item belongs to a pre-determined Item Group. Item Groups make it easy to identify similar items, regardless of what they are called by different organisations.
For example, items like tarpaulins, tarps and plastic sheets will all fall under the Item Group “tarpaulins” in STOCKHOLM.
To create an item, you must always assign it to a pre-determined Item Group.
There are two ways to create a new Item:
- Individually, as described in this Guide; or
- In bulk, for new Geographical Areas or for Agencies with no existing Items in STOCKHOLM. For further information, see the Adding Items in Bulk User Guide.
How to create individual items
1 . Open the Manage data menu.
2. Select Item list.

The Manage item list page will open, displaying items that your organisation has already added in STOCKHOLM.
3. Click the Add new item button.

A blank form will open.
There are two steps to add a new Item to STOCKHOLM.
Step 1 of 2: Add/Edit item details
In the form, you can enter the details of the Item that you wish to add.

4. Enter your Item name and add an optional Description.
In the example below, we have entered details for a ‘Synthetic Blanket’.

5. Select the appropriate Item Group from the drop-down box. You can also type into the search bar to look for an Item Group.
If you are not sure which Item Group to select, click on the link ‘Under which item group to put your item’ below the drop-down box.
You will be directed to a file with the details of each Item Group.

6. Users with a role at or above the national level will see a Standard organisation item tick box below the Item Group field.
Tick this box if the item is part of a global catalogue with standard items. If the box is ticked, the item will become available for all users operating in your agency.
7. Select any mandatory attributes that you want to attach to your item. You can tick all the boxes that are relevant for you, or even leave them all unticked.
The attributes that you tick will be mandatory fields when allocating your item to a Facility in the next step.
In the example below, Donor is selected.
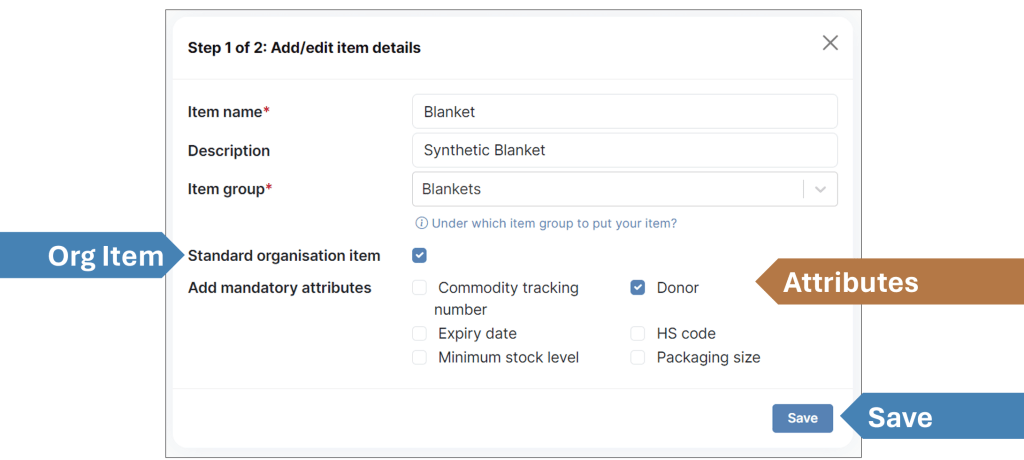
8. Select Save. You will receive a pop-up notification to confirm your Item was successfully updated.
Step 2 of 2: Allocate item to a storage facility
To complete the next step to add an Item, see page 3 of the Allocating Items to a Facility User Guide.
HOW TO VIEW AND EDIT ITEMS
1. On the Manage item list page, you can choose to display your existing items either as Cards or in a Table. In both cases, items can be sorted by name (alphabetical order or reverse).
You can also use the search bar on top to look for items.

2. Click the blue pencil icon to open and edit an Item. This will enable you to update Item quantities (see Updating Item Quantities User Guide).
3. Click the red trash can icon to delete an Item.
